Using Anaconda Package Manager
Anaconda,
from Anaconda, Inc
is a completely free enterprise-ready distribution for large-scale data
processing, predictive analytics, and scientific computing. It includes
over 195 of the most popular Python packages for science, math,
engineering, and data analysis. It also offers the ability to easily
create custom environments by mixing and matching different versions
of Python and/or R and other packages into isolated environments that
individual users are free to create. Anaconda includes the conda
package and environment manager to make managing these environments
straightforward.
- Using Anaconda
- Searching for Packages
- Creating Custom Anaconda Environments
- Using NRDStor for environments
- Adding and Removing Packages from an Existing Environment
- Moving and Recreating Existing Environment
- Remove Unused Anaconda Packages and Caches
- Creating Custom GPU Anaconda Environment
- Creating Custom MPI Anaconda Environment
- Creating a Shared Conda Environment for Group Members
- Using an Anaconda Environment in a Jupyter Notebook
- Using Mamba
- Using Apptainer to Optimize Conda Environment Storage
- Preparing your environment and directories
- Creating the environment
- Using a environment.yml file instead of packages
- Adding new packages to an existing Apptainer SIF file
- Using your Apptainer image for running applications
- Adding an Apptainer based environment to JupyterLab
Using Anaconda
While the standard methods of installing packages via pip
and easy_install work with Anaconda, the preferred method is using
the conda command.
Note
Full documentation on using Conda is available at http://conda.pydata.org/docs/
A cheatsheet is also provided.
A few examples of the basic commands are provided here. For a full explanation of all of Anaconda/Conda's capabilities, see the documentation linked above.
Anaconda is provided through the anaconda module on HCC machines. To
begin using it, load the Anaconda module.
Load the Anaconda module to start using Conda
module load anaconda
To display general information about Conda/Anaconda, use the info subcommand.
Display general information about Conda/Anaconda
conda info
Conda allows the easy creation of isolated, custom environments with
packages and versions of your choosing. To show all currently available
environments, and which is active, use the infosubcommand with the
-e option.
List available environments
conda info -e
The active environment will be marked with an asterisk (*) character.
The list command will show all packages installed
in the currently active environment.
List installed packages in current environment
conda list
Searching for Packages
To find packages, use the search subcommand.
Search for packages
conda search numpy
If the package is available, this will also display available package versions and compatible Python versions the package may be installed under.
Creating Custom Anaconda Environments
The create command is used to create a new environment. It requires
at a minimum a name for the environment, and at least one package to
install. For example, suppose we wish to create a new environment, and
need version 1.17 of NumPy.
Create a new environment by providing a name and package specification
conda create -n mynumpy numpy=1.17
This will create a new environment called 'mynumpy' and installed NumPy version 1.17, along with any required dependencies.
To use the environment, we must first activate it.
Activate environment
conda activate mynumpy
Our new environment is now active, and we can use it. The shell prompt will change to indicate this as well.
Using NRDStor for environments
By default, conda environments are installed in the user's home directory at ~/.conda/envs.
This is fine for smaller environments, but larger environments (especially ML/AI-based ones) can quickly
exhaust the space in the home directory.
For larger environments, we recommend using the $NRDSTOR folder instead. To do so, use the -p option
instead of -n for conda create. For example, creating the same environment as above but
placing it in the folder $NRDSTOR/mynumpy instead.
Create environment in NRDStor
conda create -p $NRDSTOR/mynumpy numpy=1.17
To activate the environment, you must use the full path.
Activate environment in NRDStor
conda activate $NRDSTOR/mynumpy
Adding and Removing Packages from an Existing Environment
To install additional packages in an environment, use the install
subcommand. Suppose we want to install iPython in our 'mynumpy'
environment. While the environment is active, use installwith no
additional arguments.
Install a new package in the currently active environment
conda install ipython
If you aren't currently in the environment you wish to install the
package in, add the -noption to specify the name.
Install new packages in a specified environment
conda install -n mynumpy ipython
The remove subcommand to uninstall a package functions similarly.
Remove package from currently active environment
conda remove ipython
Remove package from environment specified by name
conda remove -n mynumpy ipython
To exit an environment, we deactivate it.
Exit current environment
conda deactivate
Finally, to completely remove an environment, add the --alloption
to remove.
Completely remove an environment
conda remove -n mynumpy --all
Moving and Recreating Existing Environment
Sometimes conda environments need to be moved (e.g., from $HOME to $NRDSTOR in order to reduce used space in $HOME)
or recreated (e.g., when shared with someone). This is done using environment.yml file as shown below.
Activate the conda environment to export
conda activate mynumpy
Then export the active conda environment to file environment.yml.
Export conda environment
conda env export > environment.yml
Next, deactivate the conda environment.
Exit current environment
conda deactivate
The file environment.yml contains both pip and conda packages installed in the activated environment.
This file can now be shared or used to recreate the conda environment elsewhere.
The exported environment can be recreated in $NRDSTOR with:
Recreate conda environment in $NRDSTOR
conda env create -p $NRDSTOR/mynumpy -f environment.yml
After the conda environment has been exported or recreated, if needed, the original conda environment can be removed.
Remove conda environment
conda remove -n mynumpy --all
The migrated environment can then be activated with:
Activate new environment
conda activate $NRDSTOR/mynumpy
Remove Unused Anaconda Packages and Caches
By default, conda environments are installed in the user's home directory at ~/.conda/envs.
conda caches and package tarballs are stored in ~/.conda/ as well.
For larger or many conda environments, the size of the directory ~/.conda/ can easily reach the $HOME space quota limit of 20 GiB per user.
In addition to Moving and Recreating Existing Environment, one can remove unused conda packages and caches.
Remove unused conda packages and caches
conda clean --all
Note
Please note that this command will only remove index cache, and unused cache packages and tarballs and will not affect nor break the current conda environments you have.
Creating Custom GPU Anaconda Environment
We provide GPU versions of various frameworks such as tensorflow, keras, theano, via modules.
However, sometimes you may need additional libraries or packages that are not available as part of these modules.
In this case, you will need to create your own GPU Anaconda environment.
To do this, you need to first clone one of our GPU modules to a new Anaconda environment, and then install the desired packages in this new environment.
The reason for this is that the GPU modules we support are built using the specific CUDA drivers our GPU nodes have. If you just create custom GPU environment without cloning the module, your code will not utilize the GPUs correctly.
For example, if you want to use tensorflow with additional packages, first do:
Cloning GPU module to a new Anaconda environment
module load tensorflow-gpu/py311/2.15
module load anaconda
conda create -n tensorflow-gpu-2.15-custom --clone $CONDA_DEFAULT_ENV
module purge
Note
While tensorflow-gpu/py311/2.15 is used here as an example module and version, please make sure you use the newest available version of the module you want to clone, or the version that is needed for your particular research needs.
This will create a new tensorflow-gpu-2.15-custom environment in your home directory that is a copy of the tensorflow-gpu module.
Then, you can install the additional packages you need in this environment.
Install new packages in the currently active environment
module load anaconda
conda activate tensorflow-gpu-2.15-custom
conda install --no-update-deps <packages>
Note
When installing packages in existing/cloned environment, please use --no-update-deps.
This will ensure that already installed dependencies are not being updated or changed.
Next, whenever you want to use this custom GPU Anaconda environment, you need to add these two lines in your submit script:
module load anaconda
conda activate tensorflow-gpu-2.15-custom
Note
If you have custom GPU Anaconda environment please only use the two lines from above and DO NOT load the module you have cloned earlier.
Using module load tensorflow-gpu/py311/2.15 and conda activate tensorflow-gpu-2.15-custom in the same script is wrong and may give you various errors and incorrect results.
Creating Custom MPI Anaconda Environment
Some conda packages available on conda-forge and bioconda support MPI (via openmpi or mpich). However, just using the openmpi and mpich packages from conda-forge often does not work on HPC systems. More information about this can be found here.
In order to be able to correctly use these MPI packages with the MPI libraries installed on our clusters, two steps need to be performed.
First, at install time, besides the package, the "dummy" package openmpi=4.1.*=external_* or mpich=4.0.*=external_* needs to be installed for openmpi or mpich respectively.
These "dummy" packages are empty, but allow the solver to create correct environments and use the system-wide modules when the environment is activated.
Secondly, when activating the conda environment and using the package, the system-wide openmpi/4.1 or mpich/4.0 module needs to be loaded depending on the MPI library used.
Currently only packages that were built using openmpi 4.1 and mpich 4.0 are supported on HCC clusters.
For example, the steps for creating conda environment with mpi4py that supports openmpi are:
Creating Anaconda environment with openmpi
module purge
module load anaconda
conda create -n mpi4py-openmpi mpi4py openmpi=4.1.*=external_*
and the steps for using this environment are:
Using Anaconda environment with openmpi
module purge
module load compiler/gcc/10 openmpi/4.1 anaconda
conda activate mpi4py-openmpi
The steps for creating conda environment with mpi4py that supports mpich are:
Creating Anaconda environment with mpich
module purge
module load anaconda
conda create -n mpi4py-mpich mpi4py mpich=4.0.*=external_*
and the steps for using this environment are:
Using Anaconda environment with mpich
module purge
module load compiler/gcc/10 mpich/4.0 anaconda
conda activate mpi4py-mpich
Creating a Shared Conda Environment for Group Members
A group owner / instructor / TA can create and manage a shared Conda environment on HCC that is usable by all group members (for example, for a course or a research group), and make it available as a Jupyter kernel.
These steps only need to be done once, and should be performed by the group owner / instructor / TA.
Create the Conda Environment in a Shared Location
First, create the Conda environment in a shared filesystem location.
You will need:
- The path to the group's shared storage
- Either a list of packages to install, or
- A
.ymlfile exported from an existing environment
(see Moving and Recreating an Existing Environment)
Below is an example that creates a shared environment for a group named csce100 in its $NRDSTOR storage area.
Create a shared environment by specifying the path and package names
conda create -p /mnt/nrdstor/csce100/shared/conda/envs/name_of_the_env python=3.11
Or, create a shared environment using an environment YAML file
conda env create -p /mnt/nrdstor/csce100/shared/conda/envs/name_of_the_env -f environment.yml
Install ipykernel in the Shared Environment
Next, activate the environment using the full path and install ipykernel so the environment can appear in JupyterLab.
Activate the environment using its full path
conda activate /mnt/nrdstor/csce100/shared/conda/envs/name_of_the_env
Install ipykernel
conda install ipykernel
Register the environment as a Jupyter kernel
Replace <Course ID> with the course ID (for example, csce100),
and <Display Name> with a clear, user-friendly name (for example, Python CSCE100 nrdstor).
python -m ipykernel install --user \
  --name <Course ID> \
  --display-name "<Display Name>"
By default, the kernel is created in your home directory, which means only you can see it at this point.
Make the Kernel Visible to the Group
To allow all group members to use the kernel, copy the kernel specification to the group's shared Jupyter directory.
Copy the kernel spec into the group's shared Jupyter directory
cp -r $HOME/.local/share/jupyter/kernels/csce100 \
      /home/csce100/shared/jupyter/kernels/
If it shows \"...No such file or directory\", create folder first using:
mkdir -p /home/csce100/shared/jupyter/kernels
Check and Fix Permissions
Finally, verify that the ownership and permissions are set correctly so everyone in the group can access the environment and kernel.
Check ownership
ls -ld /mnt/nrdstor/csce100/shared/conda/envs/name_of_the_env
ls -ld /home/csce100/shared/jupyter/kernels/csce100
The group owner should be the HCC group (for example, csce100), not an individual user.
If the ownership is incorrect:
Fix group ownership
chgrp -R csce100 /mnt/nrdstor/csce100/shared/conda/envs/name_of_the_env
chgrp -R csce100 /home/csce100/shared/jupyter/kernels
After completing these steps, all group members should be able to see and use the shared Conda environment as a kernel in JupyterLab.
Using an Anaconda Environment in a Jupyter Notebook
It is not difficult to make an Anaconda environment available to a
Jupyter Notebook. To do so, follow the steps below, replacing
myenv with the name of the Python or R environment you wish to use:
-
Stop any running Jupyter Notebooks and ensure you are logged out of the JupyterHub instance on the cluster you are using.
- If you are not logged out, please click the Control Panel button located in the top right corner.
- Click the "Stop My Server" Button to terminate the Jupyter server.
- Click the logout button in the top right corner.
-
Using the command-line environment of the login node, load the target conda environment:
bashconda activate myenv -
Install the Jupyter kernel and add the environment:
-
For a Python conda environment, install the IPykernel package, and then the kernel specification:
# Install ipykernel
conda install ipykernel

# Install the kernel specification
python -m ipykernel install --user --name "$CONDA_DEFAULT_ENV" --display-name "Python ($CONDA_DEFAULT_ENV)" --env PATH $PATH
Info
If the conda environment is located in $NRDSTOR (e.g.,
$NRDSTOR/conda_env), please use the name of the environment instead of $CONDA_DEFAULT_ENV, e.g.,:
python -m ipykernel install --user --name conda_env --display-name "Python (conda_env)" --env PATH $PATH
whereconda_envis replaced with the name of your conda enironment.Note
If needed, other variables can be set via additional
--envarguments, e.g.,
python -m ipykernel install --user --name "$CONDA_DEFAULT_ENV" --display-name "Python ($CONDA_DEFAULT_ENV)" --env PATH $PATH --env VAR value,
whereVARandvalueare the name and the value of the variable respectively. -
For an R conda environment, install the jupyter_client and IRkernel packages, and then the kernel specification:
# Install PNG support for R, the R kernel for Jupyter, and the Jupyter client
conda install r.png">
conda install r-irkernel jupyter_client

# Install jupyter_client 5.2.3 from anaconda channel for bug workaround
conda install -c anaconda jupyter_client

# Install the kernel specification
R -e "IRkernel::installspec(name = '$CONDA_DEFAULT_ENV', displayname = 'R ($CONDA_DEFAULT_ENV)', user = TRUE)"
-
-
Once you have the environment set up, deactivate it:
bashconda deactivate -
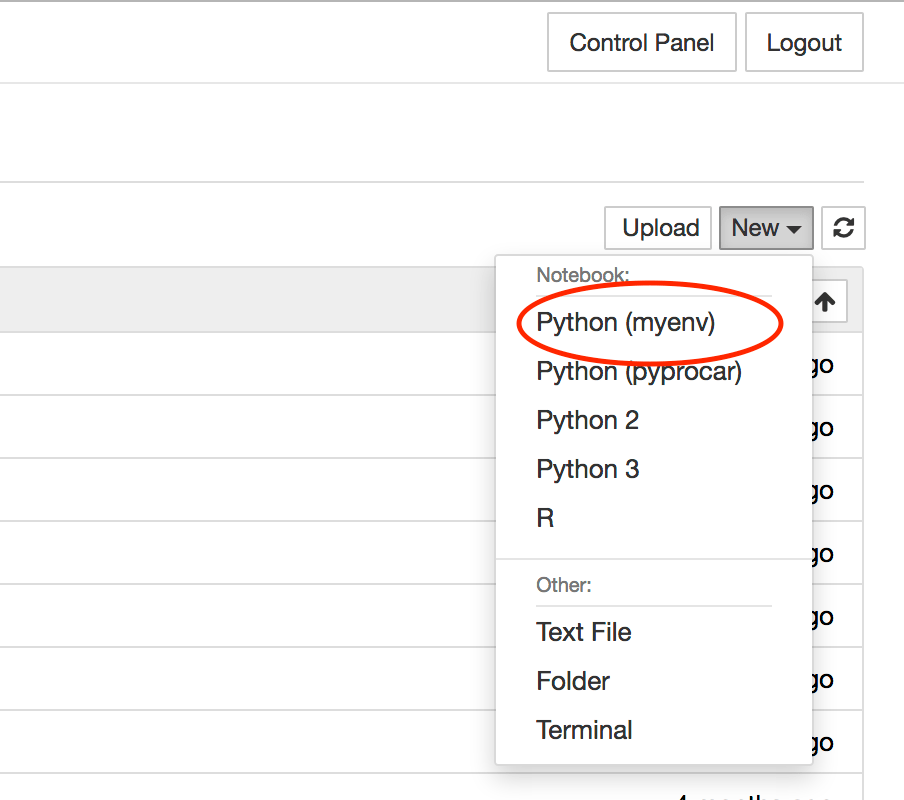
Login to JupyterHub and create a new notebook using the environment by selecting the correct entry in the
Newdropdown menu in the top right corner.
Using Mamba
Mamba is an alternative to Conda that is in general faster and performs better at resolving dependencies in conda environments.
Mamba is available as part of the anaconda modules on Swan.
Mamba can be used by simply replacing conda with mamba in all conda commands provided here.
Load the Anaconda module to start using Mamba
module load anaconda
To create a new environment called 'mynumpy' and install NumPy version 1.17, along with any required dependencies, the command is:
Create a new environment by providing a name and package specification
mamba create -n mynumpy numpy=1.17
Using Apptainer to Optimize Conda Environment Storage
Conda environments often consist of numerous tiny and small files. These small files often will each up the file limits of 5 Million on $WORK and 5 Million on $NRDSTOR. All of these small files also cause a substantial load on the metadata servers for the respective filesystems, resulting in some performance loss as a result.
By switching a conda environment to using Apptainer contaienrs instead, it reduces the environment to a single file, reducing the metadata load, inode quota impact, and makes sharing the environment in a single group easier.
Preparing your environment and directories
To help keep everything organized, create a conda_sif folder under either $WORK or $NRDSTOR. The example process will use $NRDSTOR.
Sharing with others in your research group
If this environment is one that you plan to have others in your research group use, please create a conda_sif directory under /mnt/nrdstor/group_name/shared.
mkdir $NRDSTOR/conda_sif
cd $NRDSTOR/conda_sif
pwd
    /mnt/nrdstor/demo/hccdemo/conda_sif
To help keep track of the Apptainer definition files, create a conda_def directory in the conda_sif directory.
mkdir conda_def
ls
    conda_def
Use Git!
It would be strongly recommended to store these files in a remote git repository on the University's Git instance, Github, or another remote repository provider. This provides version control for your definition files, and when used with a remote repository, provides a backup of the definition files.
Creating the environment
Since creating a conda environment can take some time and be computationally intesive, we will create it using an interactive SLURM job using the short qos to reduce our wait time.
srun --qos=short --time=01:00:00 --ntasks=4 --mem=8G --pty /bin/bash
module purge
module load apptainer
Create your environment's definition file in conda_def. The example will use basic_data_science.def as the file.
Below is a sample template to use for the file.
Bootstrap: docker
From: mambaorg/micromamba

%environment
    MAMBA_ROOT_PREFIX=/opt/conda

%post
    micromamba create -n apptainer_env python=3.11 numpy matplotlib pandas ipykernel
    micromamba clean --all --yes

%runscript
    exec /bin/bash -c 'eval "$(micromamba shell hook --shell=bash)"
    micromamba activate apptainer_env
    exec "$@"' bash "$@"

%labels
    Author Your Name
    Lab_Name Your Research Group Name
    Project_Name What project is the environment for
    Version Add a version number or date to keep track of the project
    Repository University Git or GitHub URL
When you create your file, the environment can be changed from apptainer_env, but is not required. Change the packages list to have a list of conda packages you want in your environment. If you plan to use this environment in JupyterLab, make sure to include ipykernel.
It is also strongly recommended to add information to the labels section to help identify the image in the future.
This information can be retrieved using apptainer inspect /path/to/file.sif
Example Apptainer Inspect
$ apptainer inspect basic_data_science.sif
    Author: Your Name
    Lab_Name: Your Research Group Name
    Project_Name: What project is the environment for
    Version: Add a version number or date to keep track of the project
apptainer build basic_data_science.sif conda_def/basic_data_science.def
The apptainer command will make the container image file basic_data_science.sif from our definition file at conda_def/basic_data_science.def.
This process may take some time to complete, but is done when the terminal session is ready after the lines INFO: Creating SIF file... and INFO: Build complete: basic_data_science.sif.
The image can then be tested with a quick Python command.
Note
If Pandas is not in your environment, this command will need adjusted to use a different library.
apptainer run basic_data_science.sif python -c "import pandas; print(pandas.__version__)"
If everything worked correctly, the version number, such as 2.3.1, should print out.
Using a environment.yml file instead of packages
Using the same steps and directories as above, we can switch our definition file to use a conda export yaml file.
Exporting conda environments
Steps for exporting and recreating conda environments are available in "Moving and Recreating Existing Environment above.
The only change compared to the file above is the %files section. The section expects the file for the environment be labeled environment.yml. If a different file name is to be used, it needs to be updated in %files and %post.
Bootstrap: docker
From: mambaorg/micromamba

%files
    environment.yml
    /util/opt/conda_repo/noarch
    /util/opt/conda_repo/linux-64/repodata.json

%environment
    MAMBA_ROOT_PREFIX=/opt/conda

%post
    micromamba create -n apptainer_env -f environment.yml
    micromamba clean --all --yes

%runscript
    exec /bin/bash -c 'eval "$(micromamba shell hook --shell=bash)"
    micromamba activate apptainer_env
    exec "$@"' bash "$@"

%labels
    Author Your Name
    Lab_Name Your Research Group Name
    Project_Name What project is the environment for
    Version Add a version number or date to keep track of the project
    Repository University Git or GitHub URL
Cloning existing GPU environments
To clone an existing environment, similar to Creating Custom GPU Anaconda Environment, run conda env export > /environment.yml to retrieve the appropriate environment.yml file.
Adding new packages to an existing Apptainer SIF file
If additional packages are needing to be installed to a SIF file without using the definition file, a new image can be extended using the original SIF file as the base.
Change From: to be the location of your SIF image. It must be the full path and not include any variables like $WORK and $NRDSTOR.
Change the command(s) in %post under INSTALL NEW PACKAGES HERE to contain the commands to install your new packages. The example below installs the SciPy python package.
Bootstrap: localimage
From: /mnt/nrdstor/demo/hccdemo/conda_sif/basic_data_science.sif


%environment
    MAMBA_ROOT_PREFIX=/opt/conda

%post
    exec /bin/bash -c 'eval "$(micromamba shell hook --shell=bash)"
    micromamba activate apptainer_env

    ### INSTALL NEW PACKAGES HERE
    micromamba install scipy
    micromamba clean --all --yes
    exec "$@"'

%runscript
    exec /bin/bash -c 'eval "$(micromamba shell hook --shell=bash)"
    micromamba activate apptainer_env
    exec "$@"' bash "$@"

%labels
    Author Your Name
    Lab_Name Your Research Group Name
    Project_Name What project is the environment for
    Version Add a version number or date to keep track of the project
    Repository University Git or GitHub URL
apptainer build basic_data_science_scipy.sif conda_def/add_scipy.def
Using your Apptainer image for running applications
To switch your job to start using the apptainer image, load the apptainer module and prepend your application's command with apptainer run path/to/file.sif, replacing path/to/file.sif with the path of your SIF file, such as $NRDSTOR/conda_sif/basic_data_science.sif in our example. Any conda or mamba environment activation commands should also be removed.
Using the Conda job example submit script as an example of the changes:
#!/bin/bash
#SBATCH --nodes=1
#SBATCH --ntasks-per-node=1
#SBATCH --mem=5gb
#SBATCH --time=00:10:00
#SBATCH --job-name=conda_example
#SBATCH --error=conda_example.%J.err
#SBATCH --output=conda_example.%J.out

# With conda environments, it is best practice to purge currently loaded modules
# to prevent any version or environment conflicts

module purge
module load miniforge/24.5

# Replace "name_of_your_environment" with your conda environment's name or path.
conda activate name_of_your_environment

# Run your code that uses the conda environment.
python helloworld.py
With the changes to the submit script mentioned earlier, the new submit script would look like:
#!/bin/bash
#SBATCH --nodes=1
#SBATCH --ntasks-per-node=1
#SBATCH --mem=5gb
#SBATCH --time=00:10:00
#SBATCH --job-name=conda_example
#SBATCH --error=conda_example.%J.err
#SBATCH --output=conda_example.%J.out

# With conda environments, it is best practice to purge currently loaded modules
# to prevent any version or environment conflicts

module purge
module load apptainer

# Run your code that uses the conda environment.
apptainer run path/to/file.sif python helloworld.py
Adding an Apptainer based environment to JupyterLab
This guide is adapted from https://www.rc.virginia.edu/userinfo/howtos/rivanna/custom-jupyter-kernels/.
Note
HCC resources currently do not have the jkrollout command.
Conda environments are able to be added to your JupyterLab Instances with a few quick steps.
First ensure that you have a kernels directory in the correct local in $HOME. If you have already used JupyterLab, this should already exist.
mkdir -p ~/.local/share/jupyter/kernels
cd into the kernels directory and create a directory for your new kernel. We will continue with naming the environment basic_data_science for the directory.
cd ~/.local/share/jupyter/kernels
mkdir basic_data_science
cd basic_data_science
Create a kernel.json file with the following contents:
{
 "argv": [
  "/home/GROUPNAME/USERNAME/.local/share/jupyter/kernels/KERNEL_DIRECTORY/init.sh",
  "-f",
  "{connection_file}"
 ],
 "display_name": "KERNEL_NAME",
 "language": "python"
}
You will need to replace a few values:
- GROUPNAME: Your primary HCC group name
- USERNAME: Your HCC username
- KERNEL_DIRECTORY: The name of the directory your
kernel.jsonfile is in. - KERNEL_NAME: The display name for the Kernel within Jupyter Lab
Create a init.sh in the same directory as kernel.json
#!/bin/bash
module load apptainer
apptainer run path/to/file.sif python -m ipykernel $@
In the above example, path/to/file.sif would be $NRDSTOR/conda_sif/basic_data_science.sif
The final step is to make init.sh executable.
chmod +x init.sh
After this, you will see your custom kernel in your new JupyterLab instance.