Running GRIME-AI on HCC resources
GRIME-AI facilitates the entire data science workflow for ground-based time-lapse imagery, from data acquisition to model deployment.
Stable vs. development versions
HCC provides stable versions of GRIME-AI via preinstalled software packages, thus it is not necessary to install these yourself. Development (nightly) versions do require creating your own conda environment to install them. Instructions to do this are provided below.
Running GRIME-AI using Open OnDemand
GRIME-AI is launched from within the Open OnDemand Desktop App. Please note that for processing anything other than very small datasets, GRIME-AI requires a dedicated GPU card. A minimum of 8-16GB of GPU memory is recommended, based on dataset size and complexity.
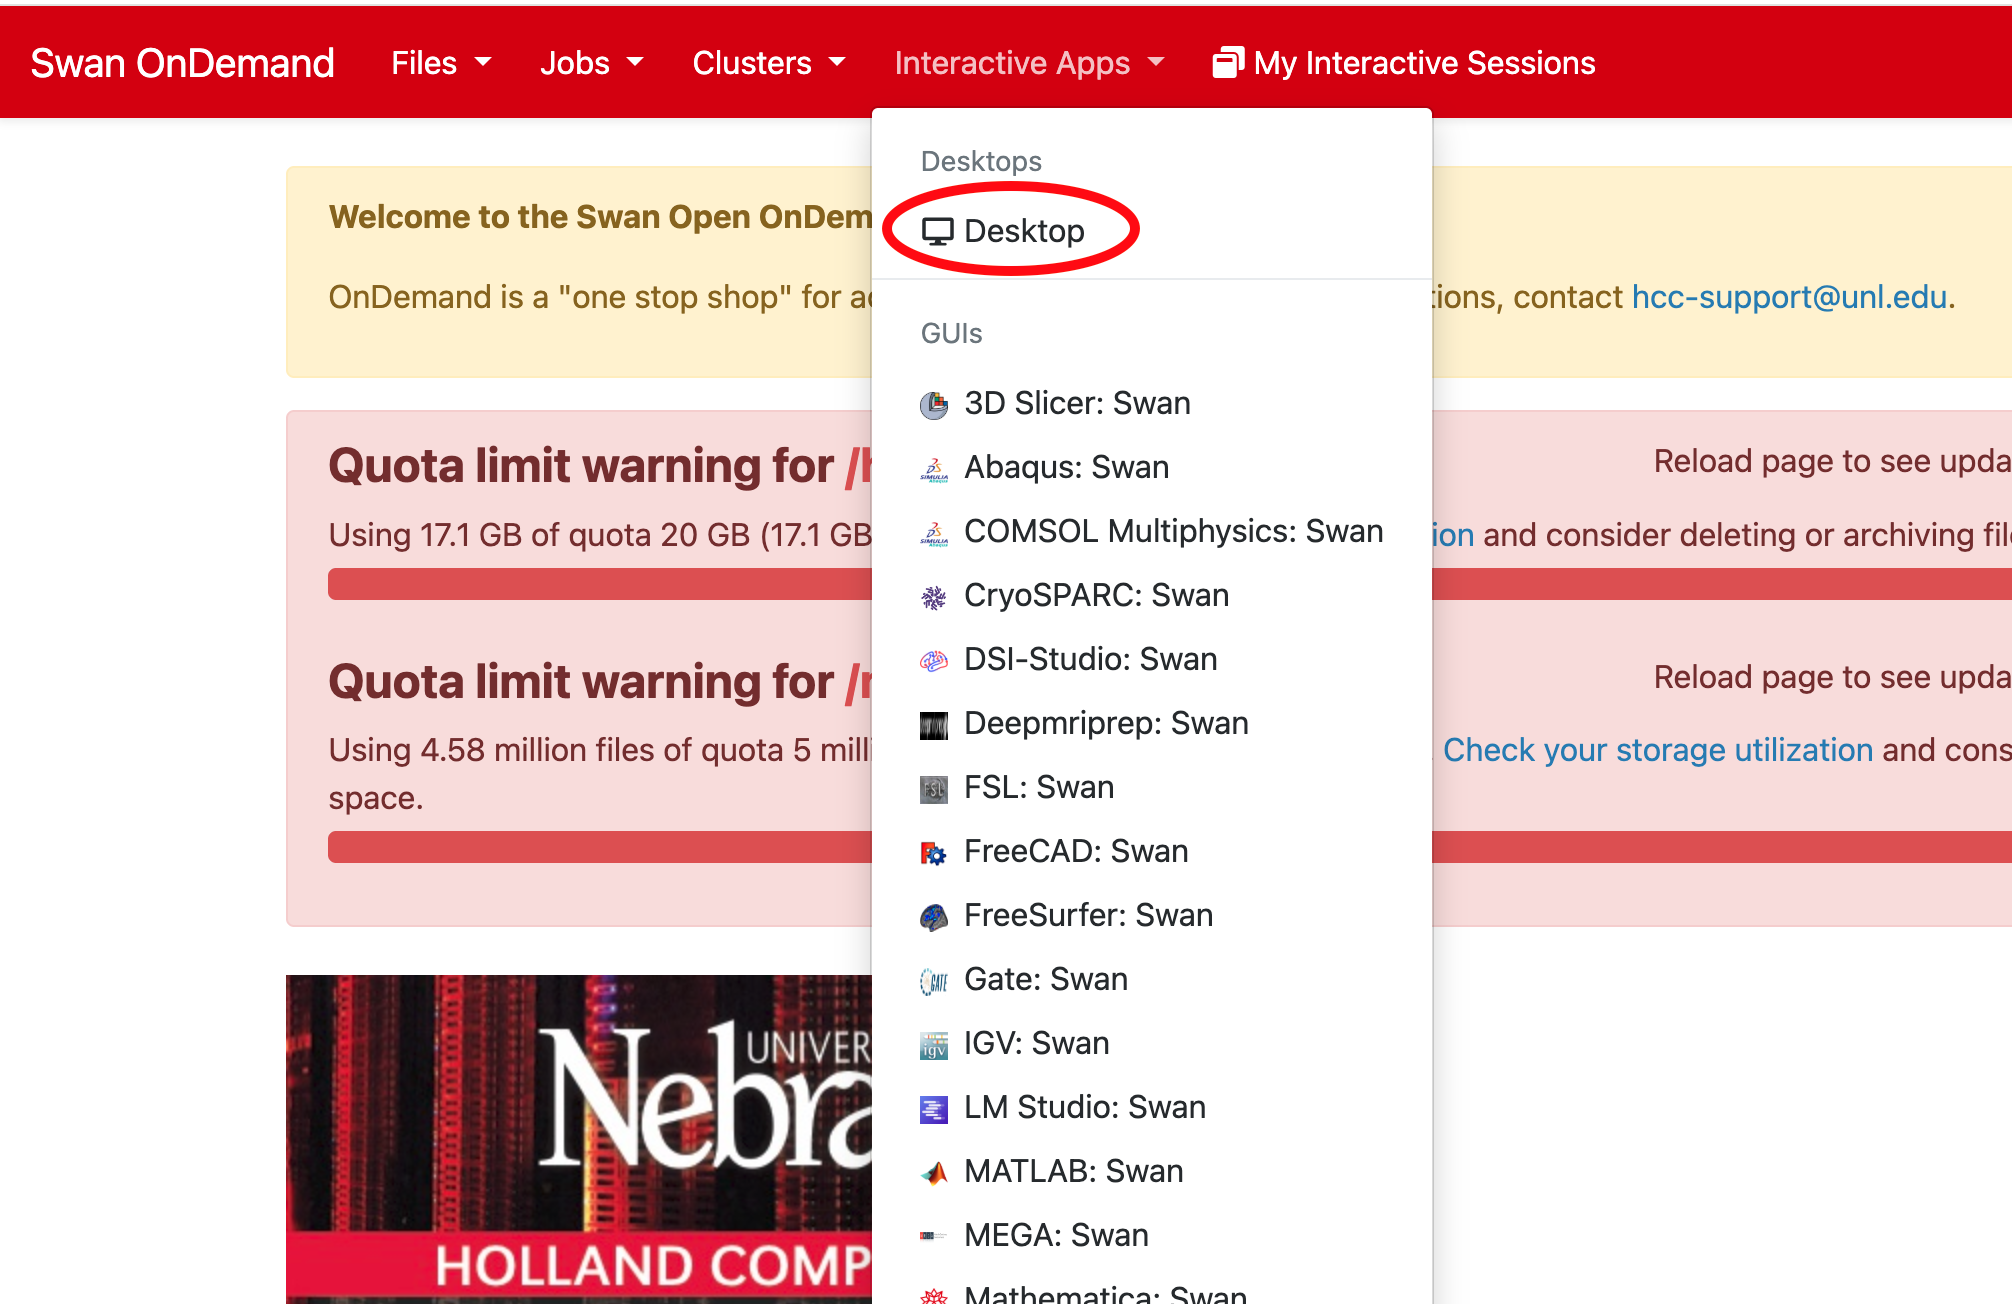
Access from Open OnDemand
Start an Open OnDemand (OOD) interactive desktop session requesting GPU resources
To start an OOD interactive desktop session, first sign into Swan's OOD portal at https://swan-ood.unl.edu.
Get an HCC account
You must have an active HCC account to use Swan's OOD portal. Sign up at https://hcc.unl.edu/new-user-request.
Once you are signed into Swan's OOD portal, start a Desktop session under Interactive Apps from the drop-down menu.
Fill out the launch form using the values below as an example to request GPU resources:
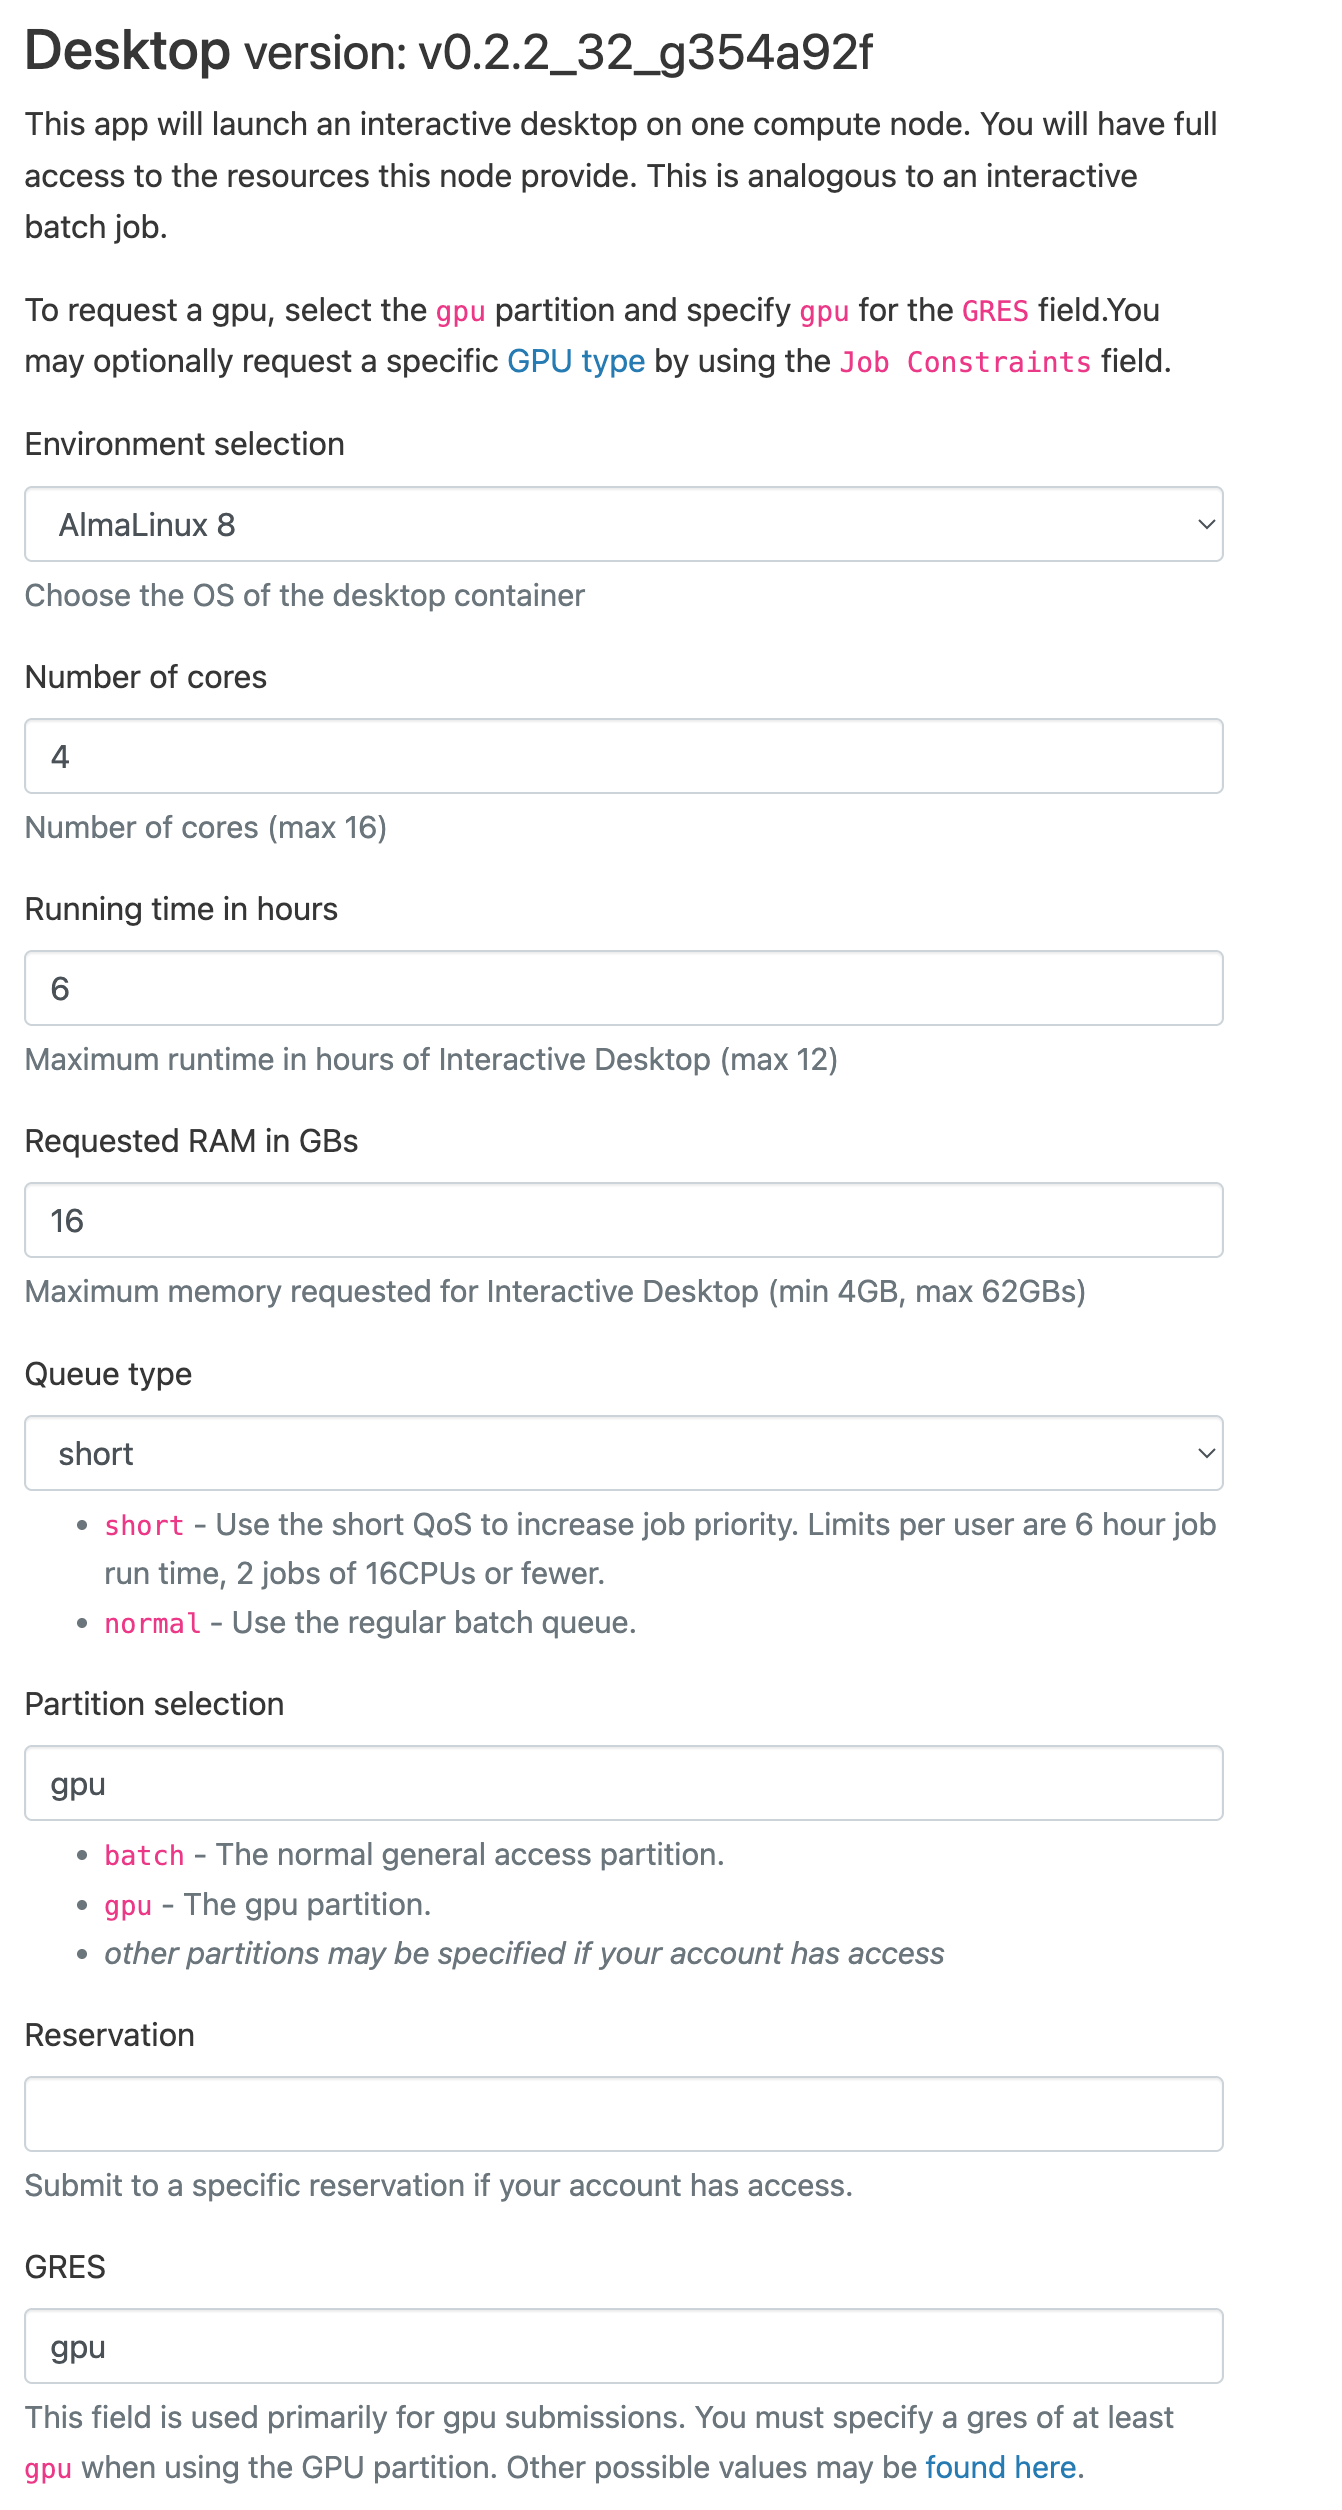
Short QoS
This example uses the Short QoS to reduce
waiting time. Short QoS jobs are limited to 6 hours. If you need longer than that, change the Queue type
entry to normal.
You may also wish to fill out the Email field and check the box to be notified when the session starts.
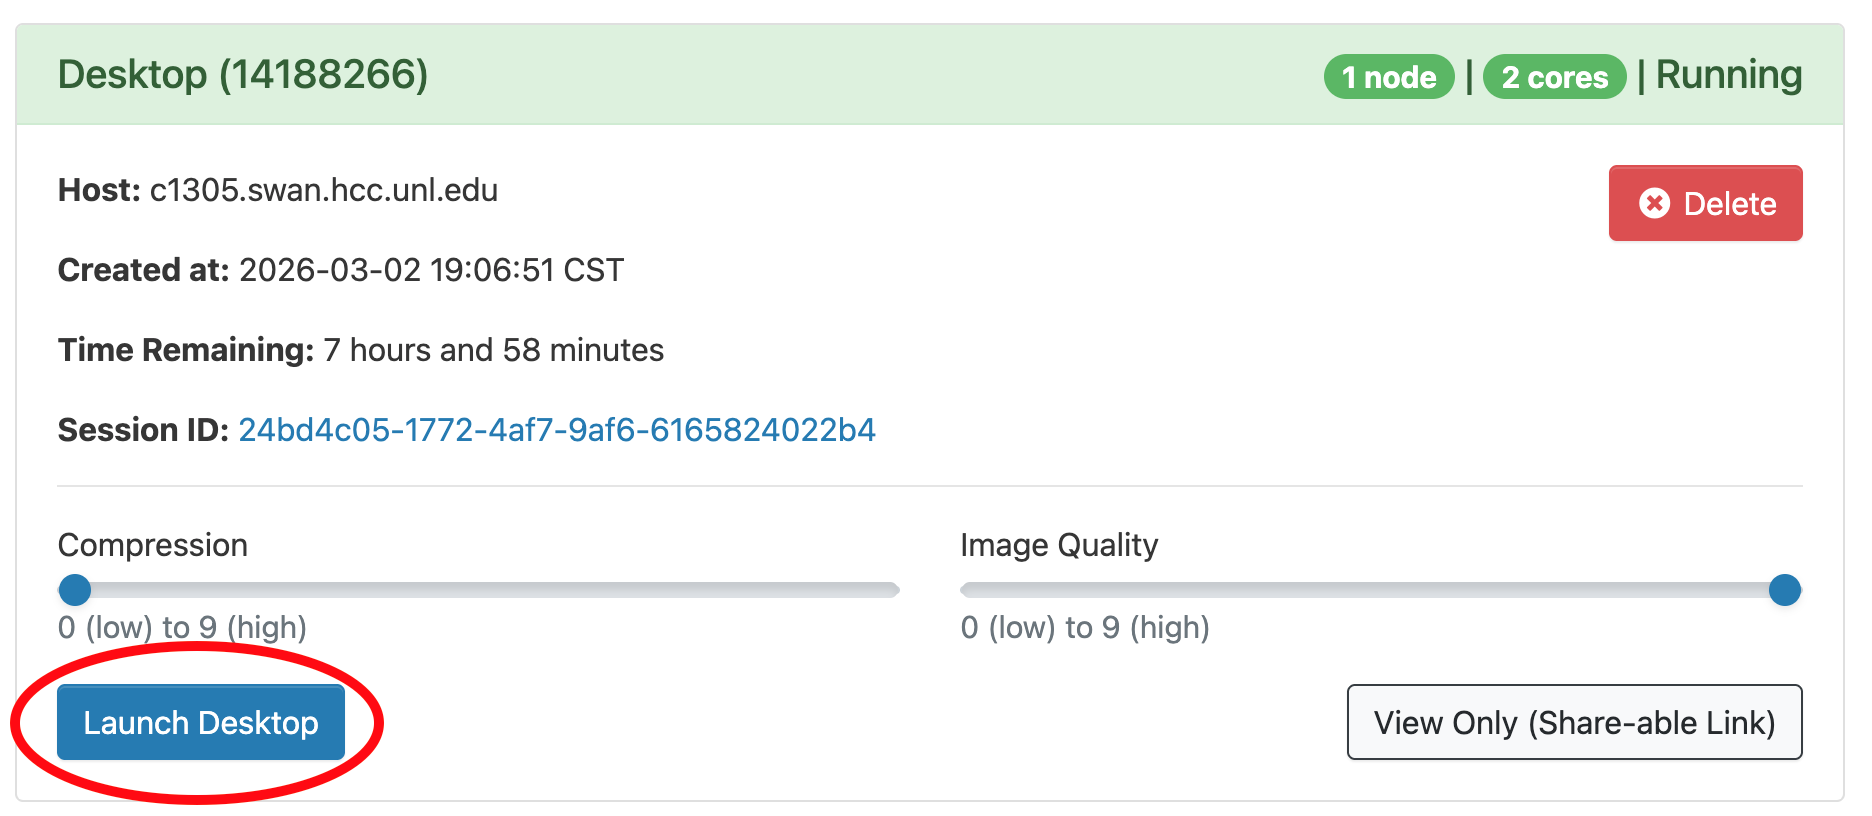
Once the Desktop session starts, a blue Launch Desktop button will appear. Before clicking it,
you may wish to decrease the Compression slider and increase the Image Quality one, depending on the
speed of your internet connection. Then click the button to open a new browser tab with the desktop.
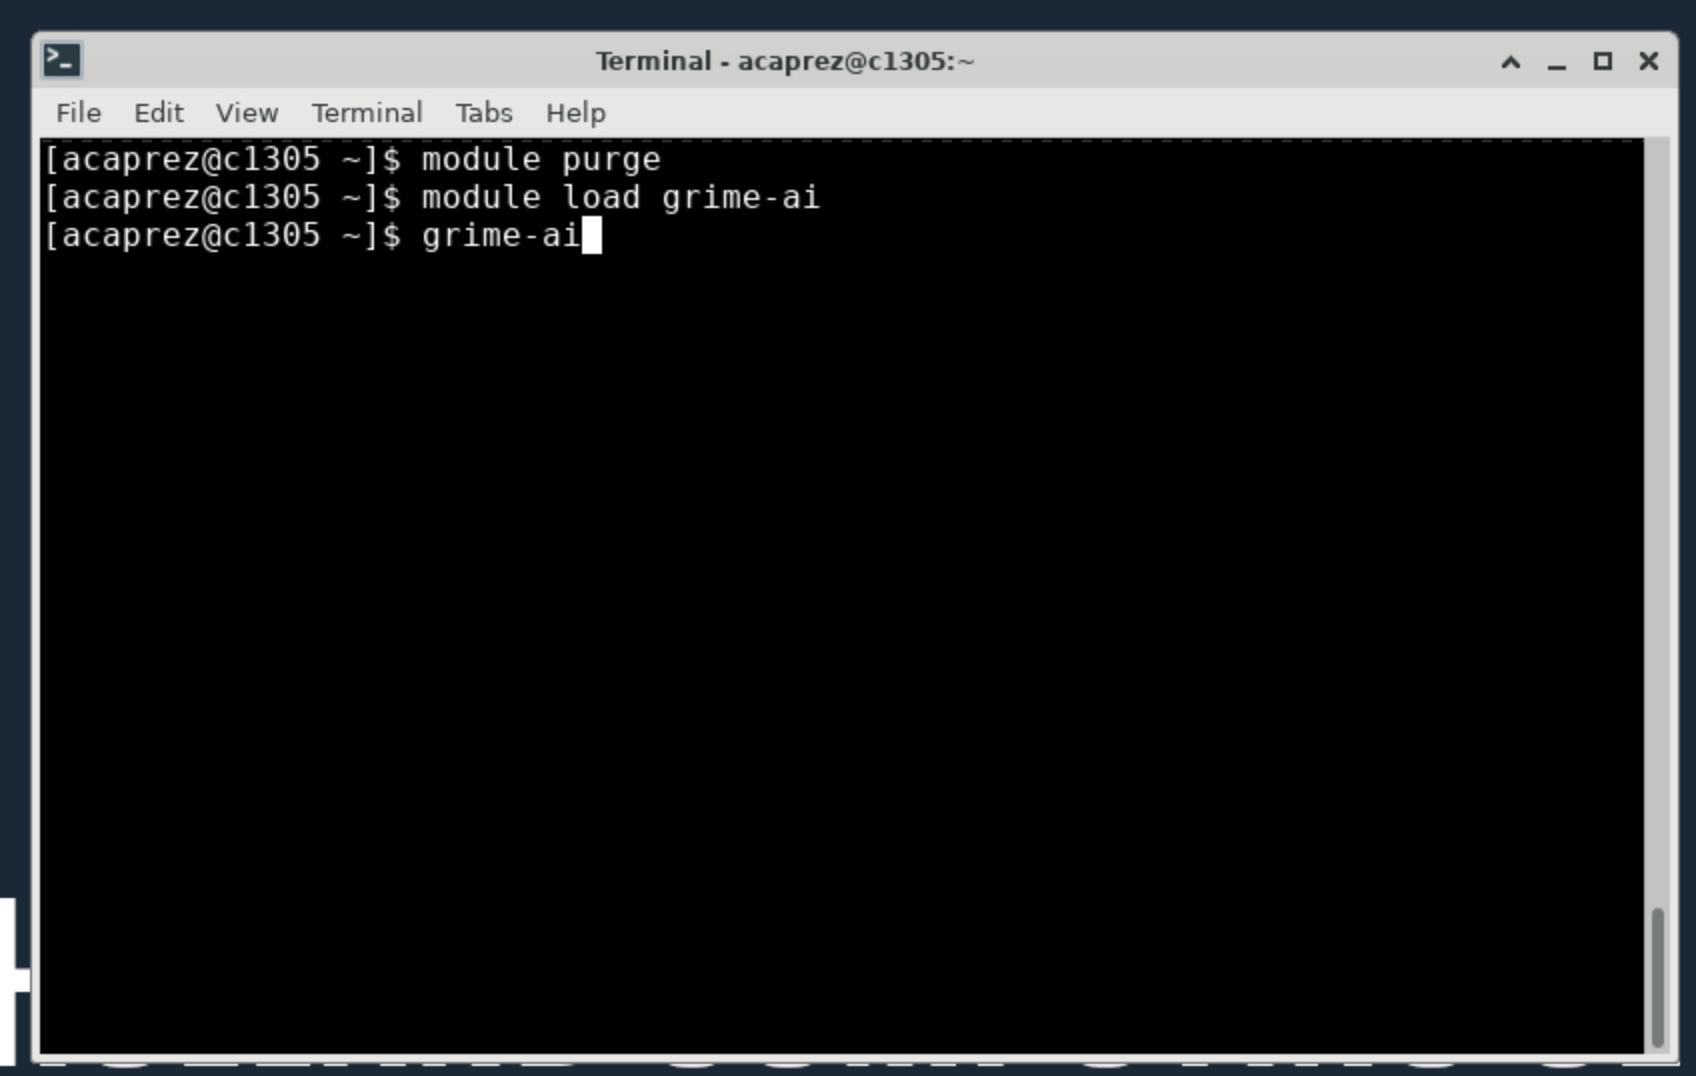
To start GRIME-AI, first open the Terminal Emulator app, second from the left along the bottom icon bar.

In the Terminal app, run the following commands, pressing Enter after each line:
module purge
module load grime-ai
grime-ai
GRIME-AI versions
The command module load grime-ai will always load the most recent version. If you wish
to use an older version, add the version number with a forward slash. For example,
module load grime-ai/1.1.0 to use version 1.1.0. Available versions may be listed by running
module spider grime-ai.
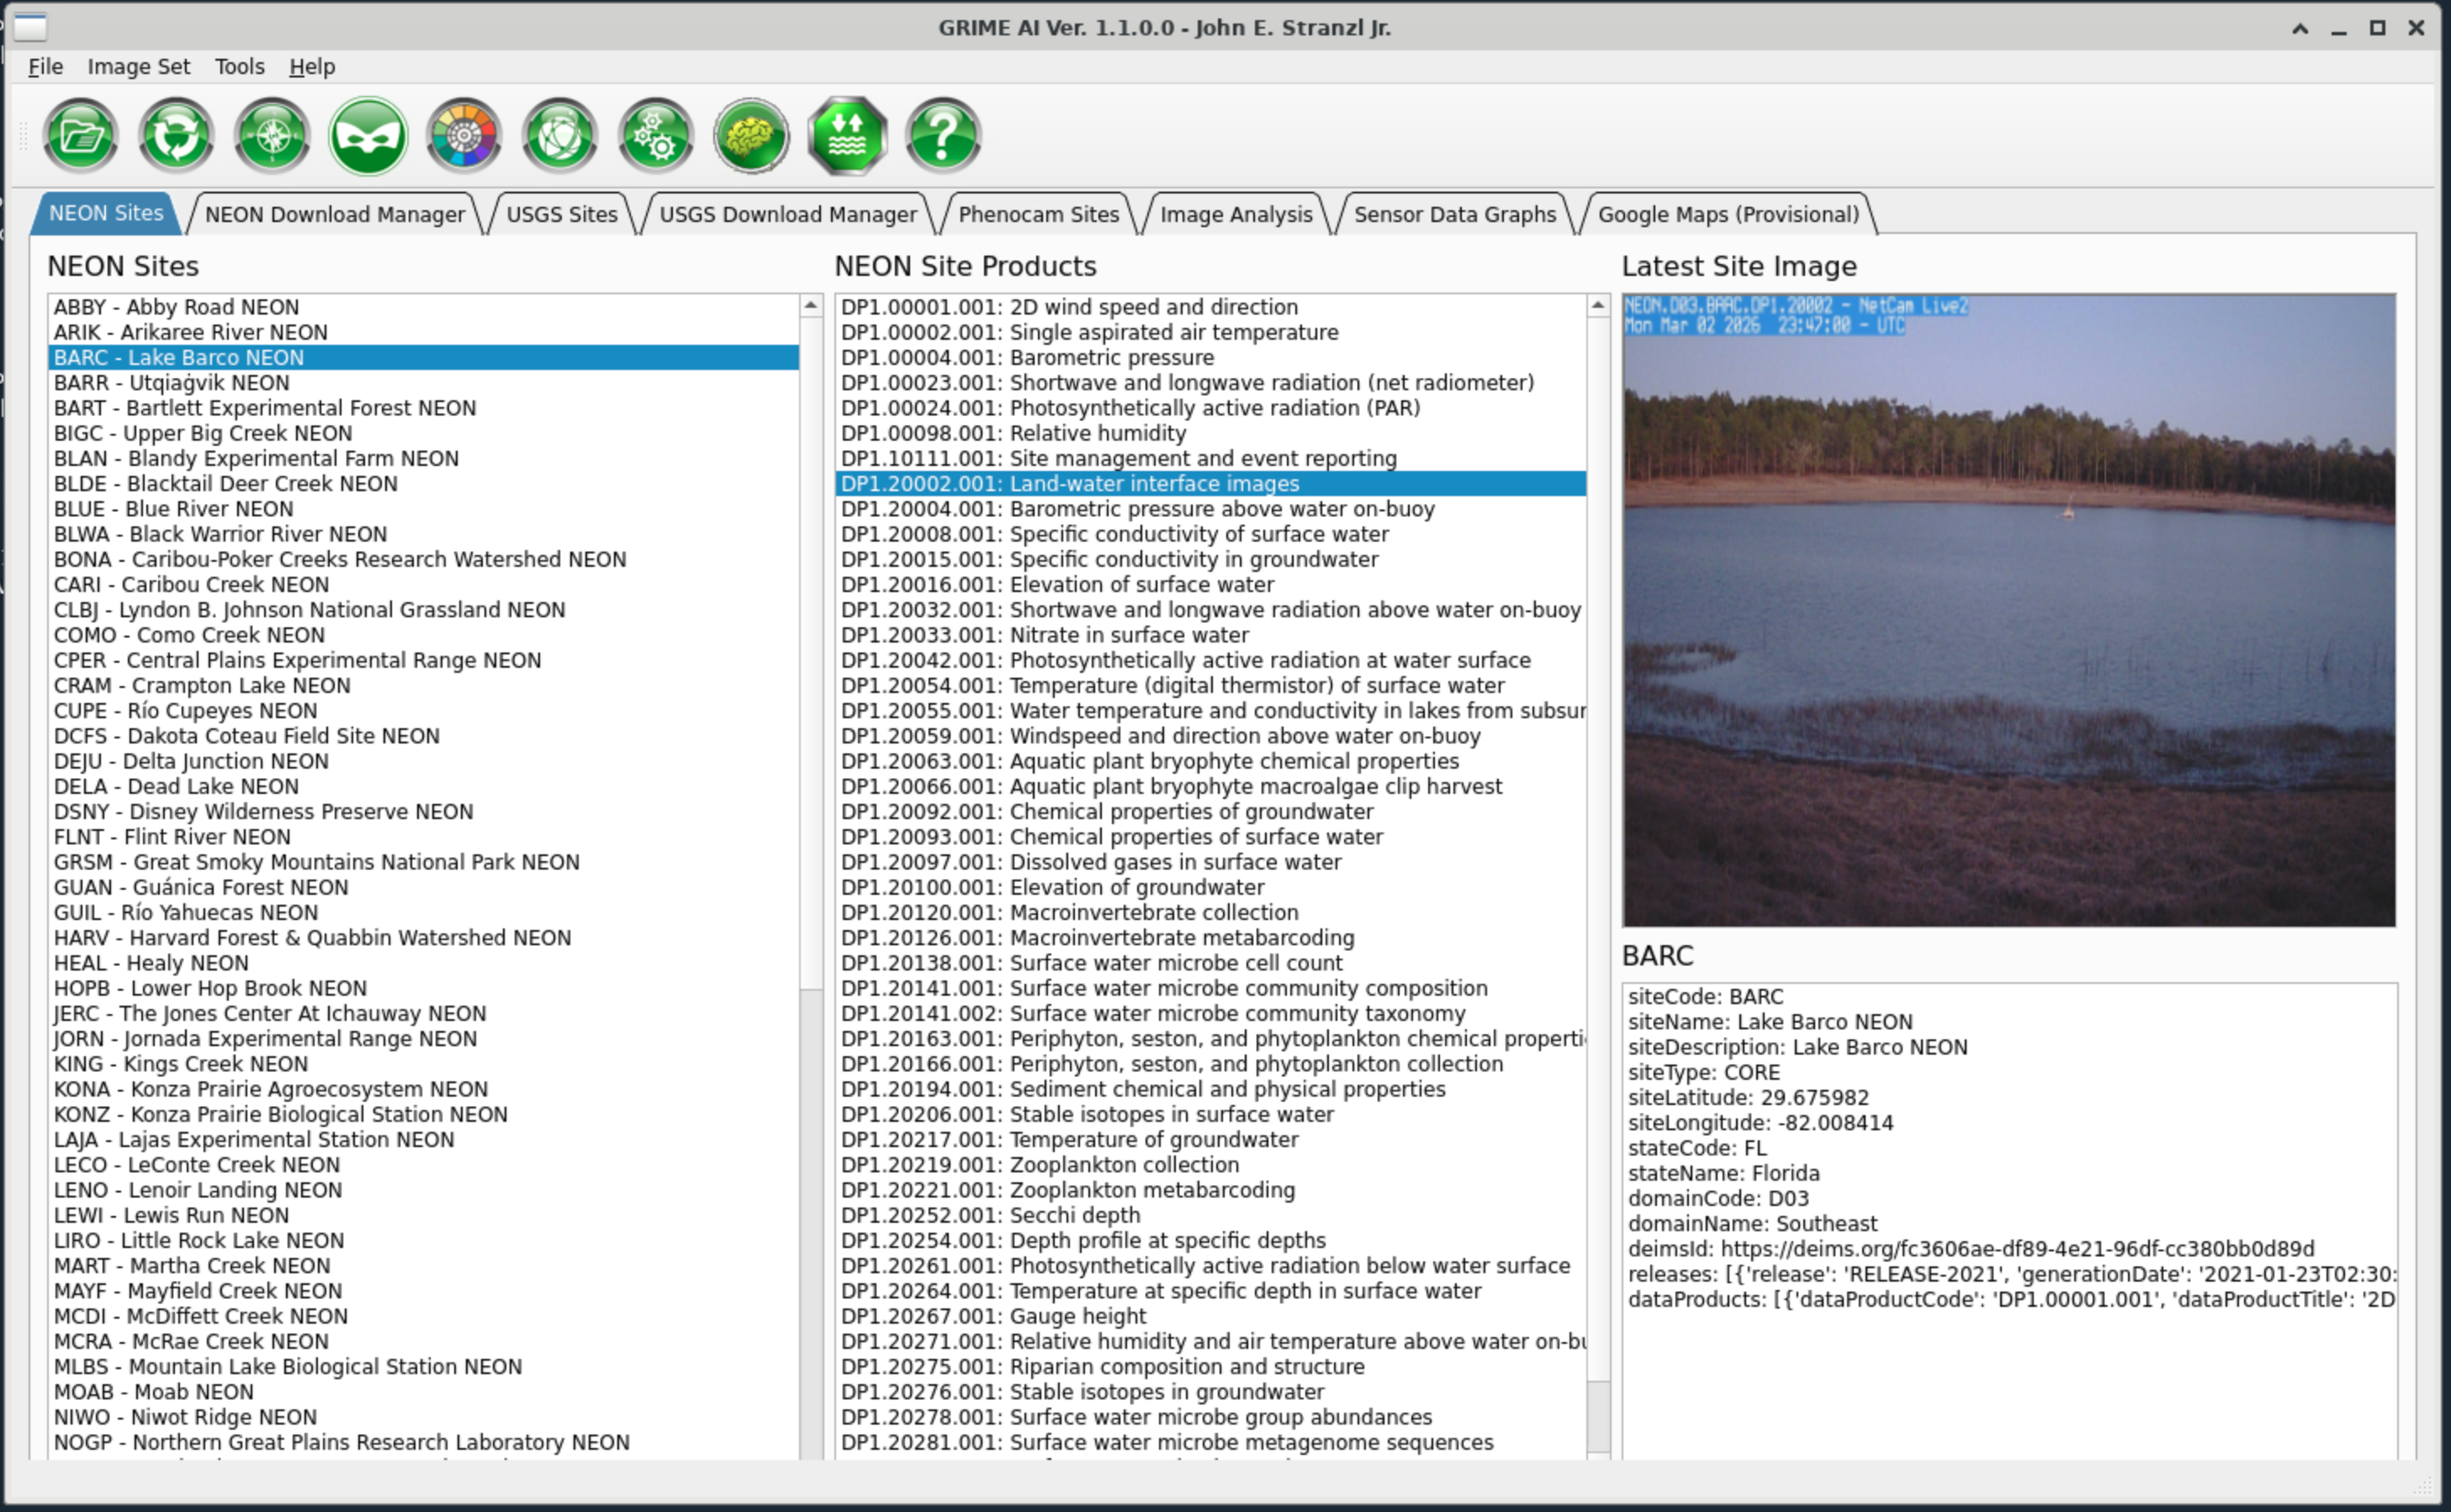
After the last command, text will start to scroll to the screen indicating GRIME-AI is starting. Please note it may take a couple minutes to fully start. After GRIME-AI has started completely, the main interface window will be visible:
You may now begin using GRIME-AI.
Running SAGE
To run the SAGE program instead, replace the last grime-ai command with sage.
Using development (nightly) versions
To use a development version of GRIME-AI, you will need to use the Anaconda package manager to create a conda environment under your user account. A conda environment can be thought of as a special directory (folder) under which a software package and all its dependencies can be installed in self-contained fashion. Multiple conda environments can co-exist without interfering with each other, allowing (for example) multiple versions of the same package to be installed. Installing the development version of GRIME-AI in a conda environment allows you to easily switch between using that version and the stable version.
To create a conda environment using the latest development version, first start an interactive desktop session as above. Open a Terminal window (again as above) but instead run the following commands:
module purge
module load anaconda
conda create -p $WORK/mygrimeai -c grimelab grimelab/label/dev::grime-ai 'pytorch=*=cuda*' python=3.12
Please note that creating the environment may take several minutes, so please be patient. The very first time will be the longest as a large number of packages need to be downloaded and extracted. Subsequent environments should be faster to create.
Next, activate the environment to download the SAM2 checkpoint files and start GRIME-AI the first time:
conda activate $WORK/mygrimeai
download-sam2-checkpoints
grime-ai
To run SAGE, change the last command from grime-ai to sage.
Please note that the SAM2 checkpoint files only need to be downloaded once for each environment created. To run GRIME-AI in subsequent sessions then, the only commands needed are:
module purge
module load anaconda
conda activate $WORK/mygrimeai
grime-ai
To update to the latest nightly build, run the following commands:
module purge
module load anaconda
conda activate $WORK/mygrimeai
conda install grimelab/label/dev::grime-ai