Formatting and mounting a volume in Linux
Note
This guide assumes you associated your SSH Key Pair with the instance when it was created, and that you are connected to the Anvil VPN.
Once you have created and attached your volume, it must be formatted and mounted in your Linux instance to be usable. This procedure is identical to what would be done when attaching a second hard drive to a physical machine. In this example, a 1GB volume was created and attached to the instance. Note that the majority of this guide is for a newly created volume.
Note
If you are attaching an existing volume with data already on it, skip to creating a directory and mounting the volume.
Formatting the volume
Follow the relevant guide
(Windows
| Mac) for your
operating system to connect to your instance. Formatting and mounting
the volume requires root privileges, so first run the
command sudo su - to get a root shell.
Running commands as root
[centos@my-linux-instance ~]$ sudo su -
[root@my-linux-instance ~]#

Next, you will need to determine what device the volume is presented as
within Linux. Typically this will be /dev/vdb, but it is necessary to
verify this to avoid mistakes, especially if you have more than one
volume attached to an instance. The command lsblk will list the
hard drive devices and partitions.
[root@my-linux-instance ~]# lsblk
NAME   MAJ:MIN RM SIZE RO TYPE MOUNTPOINT
vda    253:0    0  20G  0 disk
└─vda1 253:1    0  20G  0 part /
vdb    253:16   0   1G  0 disk
[root@my-linux-instance ~]#
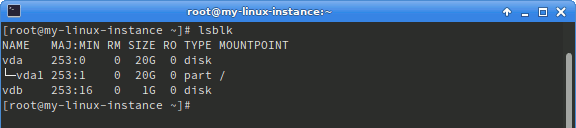
Here there is a completely empty (no partitions) disk device matching
the 1GB size of the volume, so /dev/vdb is the correct device.
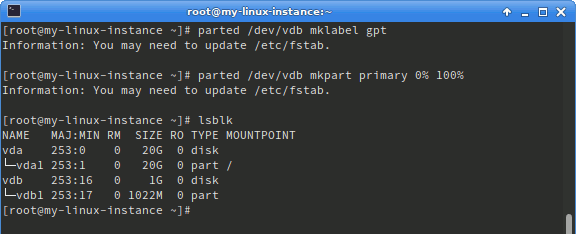
The parted utility will first be used to label the device and then create a partition.
parted /dev/vdb mklabel gpt
parted /dev/vdb mkpart primary 0% 100%
[root@my-linux-instance ~]# parted /dev/vdb mklabel gpt
Information: You may need to update /etc/fstab.

[root@my-linux-instance ~]# parted /dev/vdb mkpart primary 0% 100%
Information: You may need to update /etc/fstab.

[root@my-linux-instance ~]# lsblk
NAME   MAJ:MIN RM SIZE RO TYPE MOUNTPOINT
vda    253:0    0  20G  0 disk
└─vda1 253:1    0  20G  0 part /
vdb    253:16   0   1G  0 disk
└─vdb1 253:17   0 1022M  0 part
[root@my-linux-instance ~]#
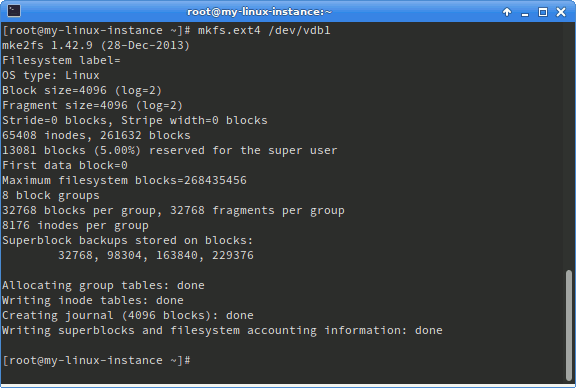
Now that a partition has been created, it can be formatted. Here, the
ext4 filesystem will be used. This is the default filesystem used by
many Linux distributions including CentOS and Ubuntu, and is a good
general choice. An alternate filesystem may be used by running a
different format command. To format the partition using ext4, run the
command mkfs.ext4 /dev/vdb1. You will see a progress message and then
be returned to the shell prompt.
[root@my-linux-instance ~]# mkfs.ext4 /dev/vdb1
mke2fs 1.42.9 (28-Dec-2013)
Filesystem label=
OS type: Linux
Block size=4096 (log=2)
Fragment size=4096 (log=2)
Stride=0 blocks, Stripe width=0 blocks
65408 inodes, 261632 blocks
13081 blocks (5.00%) reserved for the super user
First data block=0
Maximum filesystem blocks=268435456
8 block groups
32768 blocks per group, 32768 fragments per group
8176 inodes per group
Superblock backups stored on blocks:
    32768, 98304, 163840, 229376

Allocating group tables: done
Writing inode tables: done
Creating journal (4096 blocks): done
Writing superblocks and filesystem accounting information: done

[root@my-linux-instance ~]#
Mounting the volume
Note
If you are attaching a pre-existing volume, start here.
Finally, the formatted partition must be mounted as a directory to be
used. By convention this is done under /mnt, but you may choose to
mount it elsewhere depending on the usage. Here, a directory
called myvolume will be created and the volume mounted there. Run the
following commands to make the directory and mount the volume:
mkdir /mnt/myvolume
mount /dev/vdb1 /mnt/myvolume
[root@my-linux-instance ~]# mkdir /mnt/myvolume
[root@my-linux-instance ~]# mount /dev/vdb1 /mnt/myvolume
[root@my-linux-instance ~]#

Running the command df -h should then show the new mounted empty
volume.
[root@my-linux-instance ~]# mkdir /mnt/myvolume
[root@my-linux-instance ~]# mount /dev/vdb1 /mnt/myvolume
[root@my-linux-instance ~]# df -h
Filesystem      Size  Used Avail Use% Mounted on
/dev/vda1        20G  822M   20G   5% /
/dev/vdb1       990M  2.6M  921M   1% /mnt/myvolume
[root@my-linux-instance ~]#
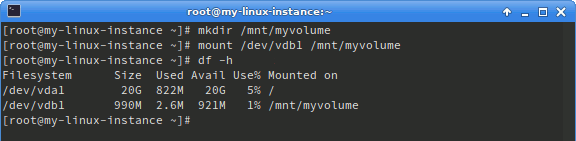
The volume can now be used.